
SIMPLE OVERLANDING DUAL BATTERY SETUP
A little background first. When we travelled around South America for 18 months, we didn't have any dual battery setup, fridges or any type of luxury like that. While it was certainly OK we haven't died and have enjoyed the journey tremendously, we often wished for one - dealing with ice and coolers outside the US is a lot less sexy (not that available) and we found ourselves craving the food that we couldn't have when we wanted it. Or the cold beer, of course.
So the decision was made - for the next leg of the journey (North & Central America) with our Toyota 4Runner, we WILL have a dual battery setup and a proper fridge.
I spent many hours and stayed up late for many nights researching all the ways to do this easily, having not too much experience with DIY electrics and vaguely remembering basic physics from high school. Most of the articles out there were either too expensive (GoalZero and the likes) or overly complicated and full of diagrams, calculations, different opinions and while I learned a lot, it left me with even more questions.
I really wished someone had done a simple thing - easy, no nonsense and cheap way to do dual batter setup, with instructions simple enough for people without experience in this and most importantly - with a COMPLETE list of parts I could just order from Amazon and not have to search for everything and spend so much time.
Well, I haven't found one like that, so now I made it for you, so you can have your life easier. I am not claiming we discovered an universe, nor that this is the best or most effective way to do it - just that it's quick and easy to do, it's inexpensive - and it works.
Before we start, I want to thank a lot to Mike for his help and expertise, without him you probably wouldn't be reading this. :)
DISCLAIMER: I am not responsible for any injury or anything going wrong while trying to do this dual battery setup. Also, this manual is vehicle specific for our 1998 V6 Toyota 4Runner, but should work on almost any car/truck/van. Not sure if I really have to write this here, but I've seen it in the movies ;)
Easy-Peasy Dual battery setup
Part 1 - What it does and how it works
For our (and I think most of the basic overlander) needs in our Toyota 4Runner, we wanted a simple thing:
- to have a small compressor fridge - the real deal, not the thermoelectric ones that do not really work in the heat and draw too much energy
- have a second battery, that would power that fridge for at least 2-3 days without us moving the car. Charged by the alternator while we're driving.
- and also use the battery to charge some phones / tablet / camera batteries, occasionaly a laptop and a small fan for when it will be too hot
This setup does it all, while being very simple. It consists of:
- The battery itself: 100AH AGM Deep Cycle battery in a clever, time saving Battery Box.
- The magic box: Automatic charging relay - this small box will (simply said) ensure, that you will charge your main and second battery while the engine is on, but makes sure you won't run your main battery flat by disconnecting them after you turn it off.
- The "necessary but boring" stuff: Cables, Terminals, Fuses etc.
- And some optional suggestions what to buy.
Some specs of the setup:
- 100AH capacity, so roughly 1200W. The same capacity as GoalZero 1250, that costs 1500$, for fraction of the price.
- Two cigarette lighter slots, with a 10Amp resetable breaker (like fuse, but if it blows, you just reset it with a push of a button, so better) good for devices roughly up to 120W of power (used it with inverter and 130W laptop adapter with zero issues), but practically a bit more.
- It also has two external battery terminals (with 60Amp resetable breaker, so roughly good up to +-720W) which you can use for hooking things directly to the battery, should you wish. Good idea would be hooking an inverter straight to this battery and only turn it on when you need it, or fridge.
- Simple built in battery meter, that will show you the state of charge of your battery. However, as this is on the top of the battery and harder to see when under the bed, I prefer to use the USB charger with voltage meter (super handy also for checking your starter battery), that will show me the exact voltage immediately.
- With this, we are able to do what we wanted - stay and camp for 2-3 days without turning the engine on, while only draining the battery to somewhere between 50-75%. Hot climates mean about 2 days, cold probably about 4. You could run the AGM battery lower than that without a problem(to about 25%), but we prefer to have longer life for the battery :) If we stay for a longer time without moving the car, we simply turn the engine on and idle for one-two hours and the battery is full again - for a price of two liters of petrol - so not worth the additional trouble and cost of solar panels. If you'd wish to add them though, it would be really easy.
Part 2 - The shopping list
Disclaimer - yes, these links are sponsored - that means you will pay absolutely the same amount, as you would if you have found these on your own - but instead of giving Amazon all the profit, they will (or should, I've actually never tried this) give me a little bit of their cut - enough for about two-three better beers if you've ordered everything. If you for some reason didn't want to use them, feel free to do so - I am certainly not doing this for profit - writing this from the beach of lake Petén in Guatemala. But if you'd wish to buy me that beer, I am not stopping you ;)
I am in no way associated with any of the brands I've used here - I am always trying to save money where I can, so most of the links included in this list were the best value for money that I found on Amazon. You are more than welcome to search for alternatives - just know, that I've spent a few hours shopping around and these were the ones I've bought, unless specifically written there. And I am a cheapskate ;)
You can find the shopping list here:
kit.com/ivanbustor/simple-overlanding-dual-battery-setup
I recommend adding it all to Amazon cart first, read the article & the descriptions of the items on kit.com and then remove the items that you don't need. Or make changes based on what's written there and your car (for example, larger car needs longer cable than our 4Runner):
If you're not from the US (like us), I really recommend signing up for free trial of Amazon Prime - you'll get free 2nd day shipping, and can easily return anything if it doesn't fit for some reason. Cancel the subscription before it renews and it won't cost you a cent.
Part 3a - Instructions for super lazy people and/or with no place/tools to work on a car at all
Absolutely nothing wrong about doing this, I considered it myself.
Read the description of the items on kit.com, buy the things you need (change the fridge for one that fits your needs), load them into your car and ask friends/community in the place where you bought the car for a good cheap mechanic. Go to him, show him this article and pay him to do it. For someone with skills and tools, this should take not more than a few hours.
Alternatively and even better option, if you're travelling the Panamerican Highway like us - buy the things from Amazon, load it to your vehicle and once in Mexico, find a mechanic on iOverlander and let him do it for cheap, while you have a few beers. Done.
Part 3B - Instructions
I am going to write this with the assumption you do have some basic tools for car maintenance (spanners, pliers, phillips screwdriver, ideally access to drill), or can borrow or better buy them - they will be good for your overlanding trip. Nothing fancy - just so you can disconnect the battery, drill some holes and screw stuff in. If you're really truly absolutely new to everything, maybe bring a friend or ask on Panamerican Travellers Asociacion facebook group if there's someone who has three hours time to help and is near you - once you have the stuff bought, so you don't waste their time.

Step 1
Find a place where you'll put your second battery. The battery itself will go into the MinnKota battery box, so look up the dimensions in the amazon shopping list from kit.com and grab a measuring tape. We decided to remove the back seats in our 4Runner, so we have more space - the battery and fridge goes underneath the bed where one of the seats was.

Step 2
If you have the bed inside of the car as well, measure everything - so you know it will fit. The battery box probably will (look on the MinnKota box dimensions), but the fridges are mostly quite tall.
We chose the Dometic brand - good quality, decent price - and their fridges are not too tall (about 42.5cm), they mostly differ in length/width, so they fit nicely.
We made a small platform behind a front seat from a piece of plywood with a small wooden leg screwed in that - just two pieces. The fridge goes on top of that (where the propane is on this pic) - we did cut out a little bit of our plywood bed construction and with that, the top of the fridge is leveled with top of the bed and could be covered with the materass (view previous photo). As we only rest our feet there while sleeping, that is no issue at all and the materass provides another layer of insulation for the fridge.

Step 3
Now that you know where you'll battery box and fridge go, it's time to do actual work. First, disconnect your car battery - and don't touch the cables or let the cables touch anything conductive (car, you, things you're holding). If not sure how to do this, watch this video on YouTube:

STEP 4
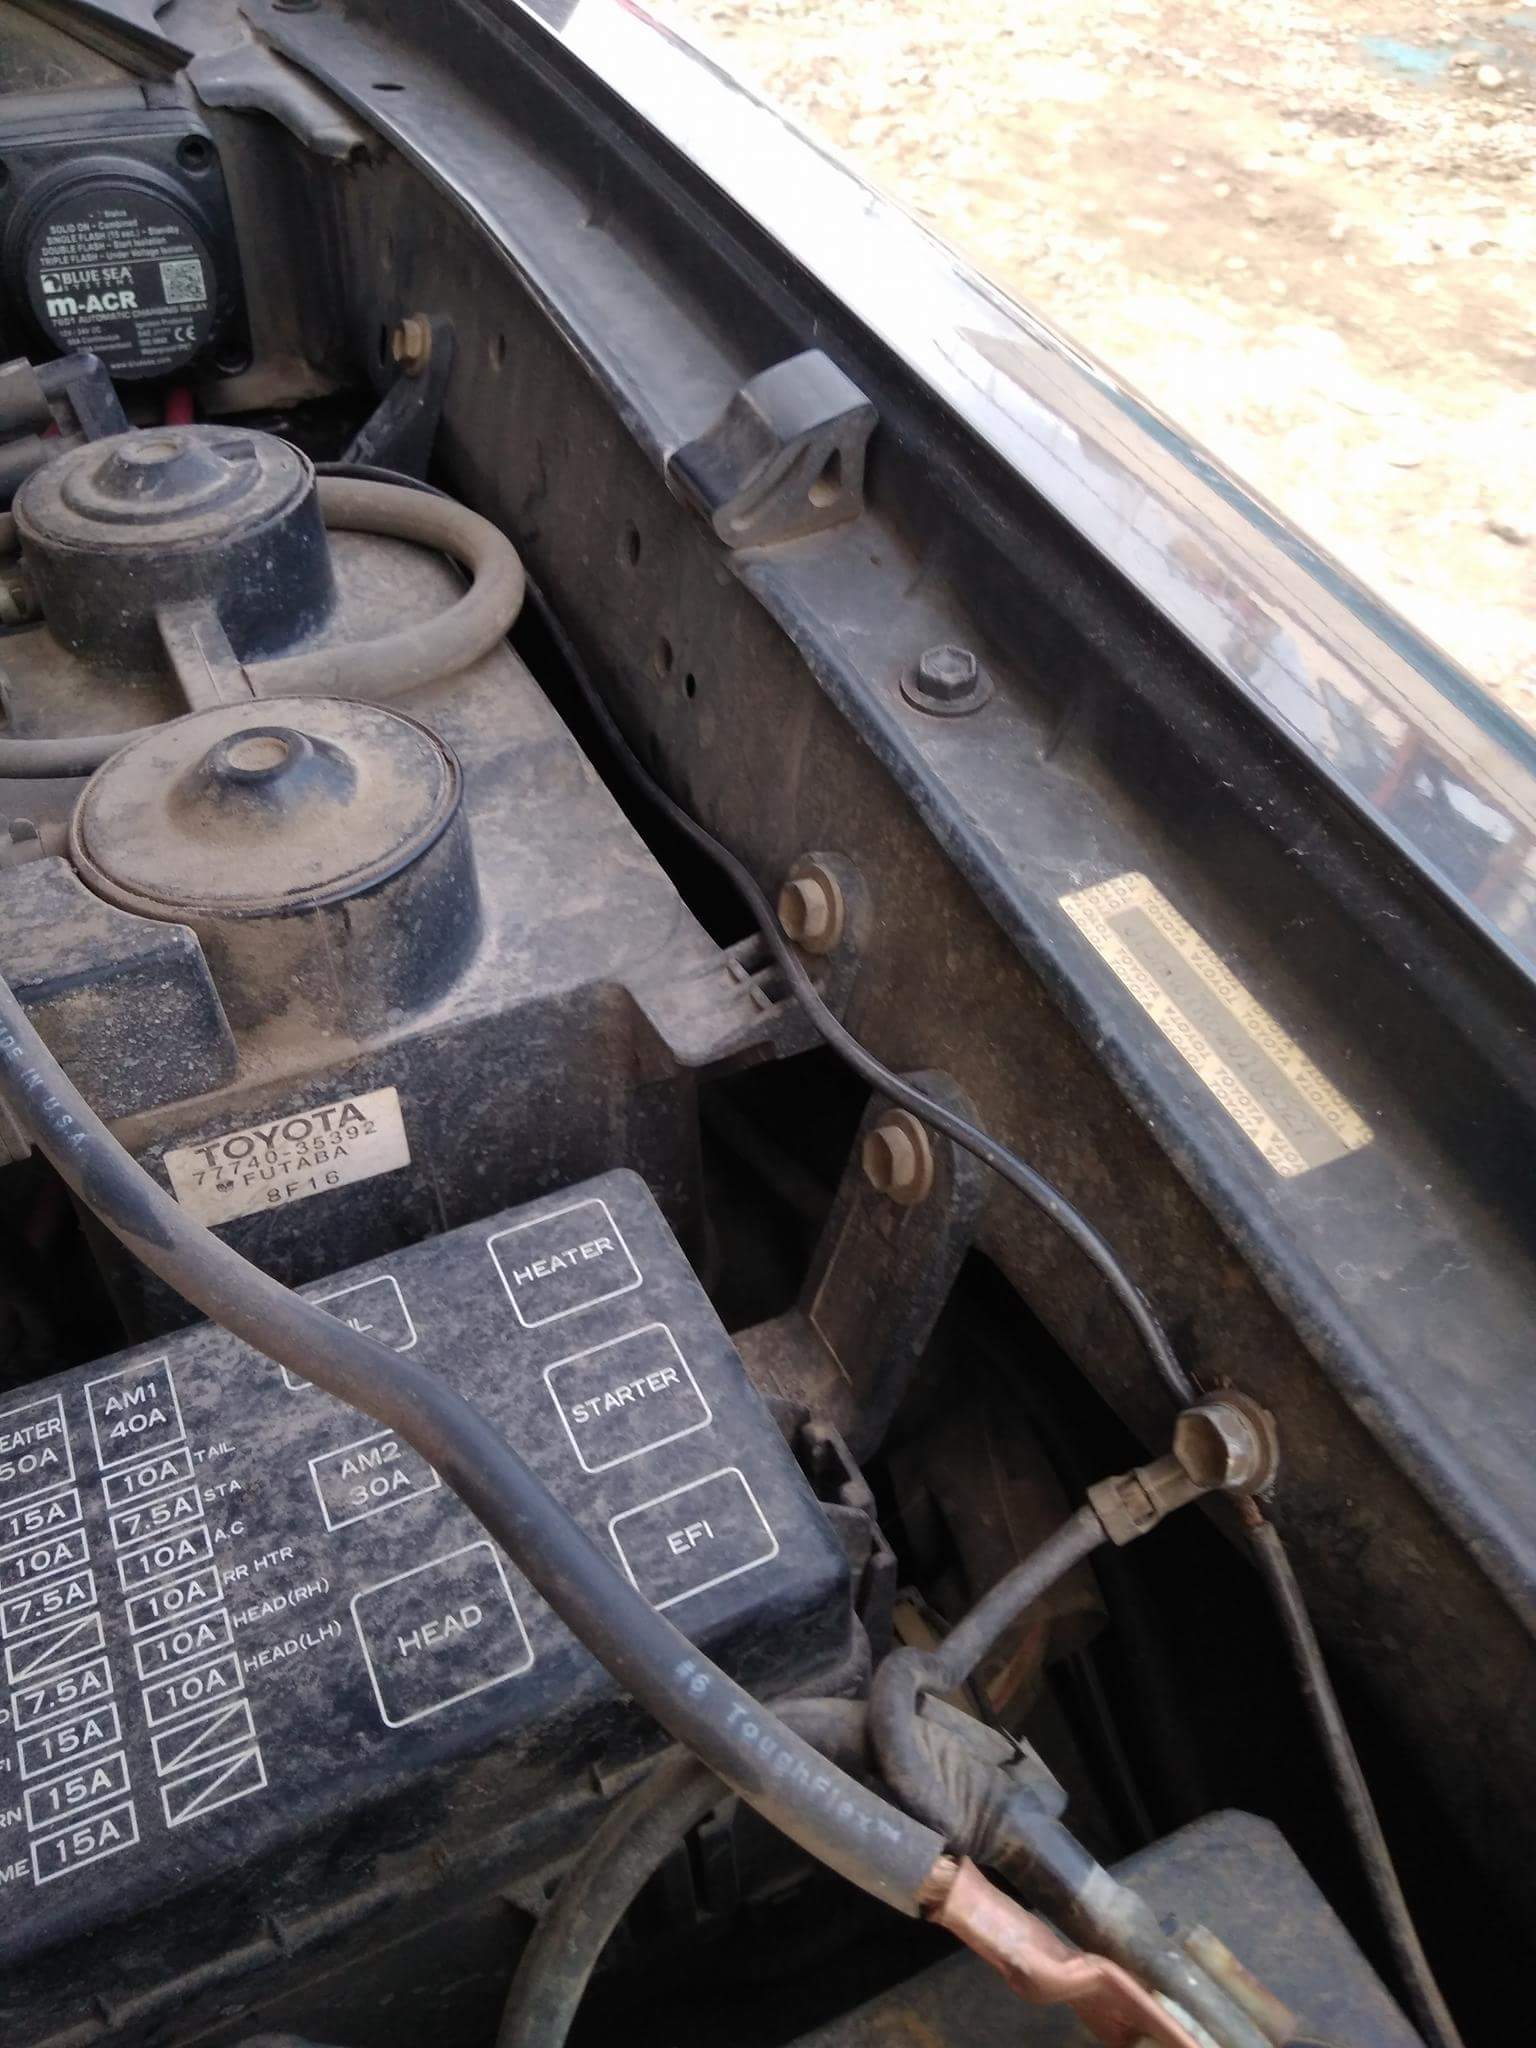
Find a good place to mount the Automatic Charging Relay (ACR from now on). You have to pop it open and screw the back part into the metal somewhere in your engine, not too far from the battery. Most of the cars should have some space in there, picture shows where we mounted ours.
If you have some time and want to see a quick video about wiring in the ACR, look here:
https://www.youtube.com/watch?v=dyzgfLTQruA

Step 5
Take the red thick (6AWG) cable and measure the distance from your battery's positive (+) terminal to the ACR. Try to go as short as possible, but not over things that can get hot. We will be using zip ties to hold that in place. When you'll have measured it, measure it again to make sure it will go there nicely - and maybe give it 3-5cm more to make sure you'll be all right. Cut the cable with the desired length and set aside. We'll call this CABLE1+ from now on.

Step 6
You will need to connect the ACR with your second battery in the car AND run the negative cable back to your starter battery. Decide if you want / can put the cables through the firewall of your car - that's the part between your engine and the interior of the car. It can be a lot of work and a hassle to get there, so we decided to lead the cables down through the engine, underneath the car and then make two small holes (don't worry) for them in the floor instead. This was a lot easier and probably quicker, not mentioning no need to hide big thick cables running through your car.
If you do it like us, find out the spot where you'll make the holes - look on my picture for inspiration. I just used Phillips screwdriver to remove the panel, lifted the carpet and found a place close to the place where the battery will sit.

Step 7
This is the only need of "heavy machinery" in this manual - take a good strong drill, take one size larger drill bit (for metal) and drill the two holes, about 1cm apart from each other. Picture included. We did broke one drill bit while doing this, so had to buy extra...
When you finish, take a metal file and give it a good scrub :) You don't want sharp edges where your cables will go.

Step 8
Put your battery in the MinnKota battery box, don't plug anything in yet, and put the box in the desired position in the car. When in place, take the rest of your red positive (6AWG) and measure the distance from the ACR to the positive (+) terminal of your second battery in the MinnKota box, leading the cable down through the engine, below the car, through one of the holes and to the battery in the box. Make it nice and tight below the car, ideally use two people - one below the car leading the cable and the other getting it through the engine and up the hole.
Don't forget (if you're doing it like us) that the carpet will go back on that part of the floor, so you can hide a bit of the cable nicely there :) Once you've measured it, double check again - and then cut the cable, if necessary. For the 4Runner and the cable in the kit, the rest was actually just the amount we needed, so no more cutting. Set aside the cable. We'll call this piece CABLE2+ from now on.

Step 9
The second battery needs to be grounded, or no electricity would flow through it from the main battery. The easy and lazy way internet suggests is grounding it by connecting to the car frame, but we will do this properly.
Take the thick black negative (6AWD) cable and run it all the way from the second battery's negative (-) terminal, through the second hole in the floor, underneath the car, and up to the engine area and the negative (-) terminal of the starter battery. Measure how much you need, make it a nice tight fit. Once you've finished, double check. Cut it to that length and set aside. We'll call this piece CABLE3- from now on.
Step 10
The ACR box also needs to be grounded - that's what the small 16 Gauge (16AWG) cable is for. You can do this by connecting the ACR to the negative terminal of the starter battery, or more lazy like we did - to the bolt on chassis, look on the picture (upper thin black cable). This cable carries almost no current at all, so no big deal. Measure the distance of the cable needed, cut and set aside. We'll call this piece CABLE4- from now on.
PS: No more cables. Hurray :)

Step 11
Take the Fuse Block Terminal (thing with red cap). Take your fuse (ours was 80AMP) and insert it into the Fuse Block Terminal.
Take the copper ring terminals (should be the 3/8 inch or 5/16inch, but check) and look if it fits on the top part of the fuse block (hidden with the red cap). Put it next to your CABLE1+
Attach the Fuse Block Terminal with the fuse inside to the positive terminal of your starter battery (look on pic) - the hole goes on the top of the terminal, then you put the positive cable of your starter battery and tighten it well.

Step 12
Take the copper ring terminals (should be 5/16 inch) and look if they fit the ACR. It's dual sensing ACR, so it doesn't matter which side you choose. If they do, take two of these and set aside one with the CABLE1+, and the second one with the CABLE2+.

Step 13
Take the copper ring terminals (I am glad for Ctrl+C as I'm writing this) and check which one fits the negative terminal of your starter battery. Set aside with the CABLE3-.

Step 14
The ACR has to be grounded too - check the picture, it's the connection on the bottom :) Should be female spade crimp terminal. Check if it fits (depends on the ACR model, if not, just go to the hardware store and get the right one).
Once you have it, set it aside with the CABLE4-.

Step 15
Take the copper ring terminals and check which ones fit the SECOND battery inside the MinnKota box. Put them in the box, don't attach anything anywhere and leave them be for now :)

Step 16
Now the labour part - you are going to make your own custom length cables. Alternatively, if you really don't want to do this, you can go to an electric store just with the measurements and let them do it for you, but that would be quite expensive.
Take the CABLE1+ with the two copper ring terminals. Strip each end of the cable with a cable stripping tool, razor knife or just good sharp knife. Put the terminal link over the stripped end of the cable. Put that end with the terminal link into the Lug Crimping Tool carefully - and then hit the top part of the Lug Crimping Tool few times nice and strongly with a hammer. Check if it's nice and tight, then repeat for the other side.
Congratulations, you just made your custom cable and saved yourself a lot of money. :)
Here's a video, if you're unsure how to work with that. It's quite easy to do :)

Step 17
Repeat the process with the CABLE2+ and the SINGLE terminal link that's next to it. (the other rests in the MinnKota box for now).
Repeat the same with CABLE3- and the SINGLE terminal link that's next to it. (the other also rests in the MinnKota box, leave that there)

Step 18
The CABLE4- is very thing, so no need for the heavy Lug Crimping tool - strip the cable, put the terminal on that and squeeze it nicely with pliers (or cable tool).

Step 19
Important part: Take the CABLE2+, and run it down to the bottom of the car, and back up the hole you drilled - the same way as when you measured it. When it's through the hole, only then you can use the Lug Crimping tool the same way you did before and attach the ring terminal that you set aside in the MinnKota box.
If you do this before, you won't be able to put it through the hole ;)
The cable should now be ready to plug in to the MinnKota box on one side, and to the ACR on the other side, with enough space to do that. If it is, use zip ties to hold it in place.

Step 20
Repeat the process with the CABLE3-, leading it from the negative (-) pole of the starter battery, below the car, through the other hole. Again, only then you can use the Lug Crimping Tool and attach the remaining ring terminal from the MinnKota box.
Again, check if everything is in the right position to plug it in, and then ziptie it in place.
Take a break and have a beer / coffee - The hard part is over.
now we'll just connect everything and it's done :)

Step 21
Take the CABLE1+ and connect it to the top of the Fuse Block Terminal that's on the top of your starter battery's positive terminal (unbolt the bolt, put it on, bolt it back.) Don't touch the terminal links or the car's positive terminal with your bare hands or metal things :)
Attach the other part of the cable to the ACR in the same way.
Step 22
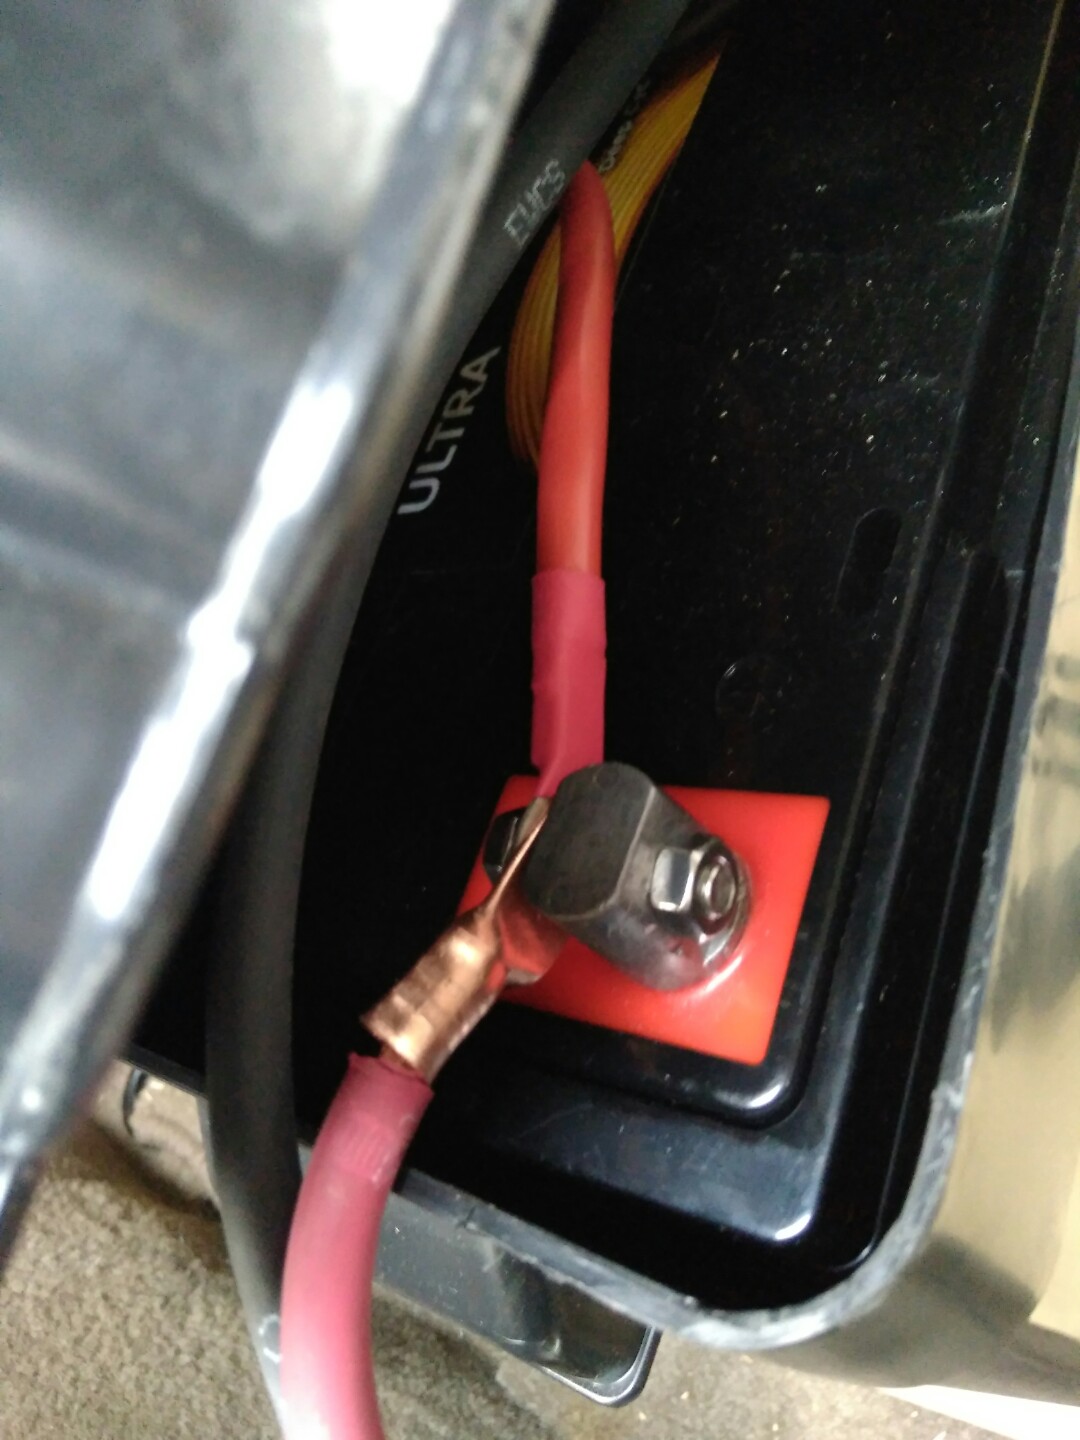
Take the CABLE2+ and attach it to the ACR in the same way (don't worry, you are not connecting it yet with the other battery, as the ACR isolates them). Then connect the other side of the cable to the positive (+) terminal of the second battery in the MinnKota Box - TOGETHER with the red cable that is already in the box :) This other cable actually connects the Box with the battery itself. It's done the same way - unbolt, attach two ring terminals, tighten it back. Look on pics if unsure.

Step 23
Take the CABLE3- and attach it to the negative (-) terminal of your second battery in the MinnKota Box - TOGETHER with the black cable that is already in the box. Then take the other side of the cable and connect it to the negative (-) terminal of your starter battery, together with the cable you unplugged in the beginning. Do it carefully, this plugs it back to power :)

Step 24
Take the CABLE4- and attach it to a bolt under the hood, like the thin black cable on the picture (alternatively, you can attach it to the negative terminal of the starter battery, wrap the stripped cable around it, or attach another ring terminal, but again, super low current here). Then attach the terminal to the small port on the bottom of the ACR (ground)

Step 25
Use Sugru to insulate the holes - just open the pack, roll it into a small hole and make a nice tight seal around the holes from both sides - top and bottom of the hole. Leave to dry for 24h, then put the carpet and the panel back (you can use the car or do the rest, just leave it to dry :) )
You are done :)
Okay, almost :) If you already have the fridge, now you can connect it to the battery.
You can either plug it to the cigarette lighter (up to 10 amps of power, most small fridges run about 6 when cooling and about 1-3amps in) and you will have one free for your devices - or directly to the battery - not going to say how, that is up to you to figure out :)
Few more steps to make sure it works nice and sound:
- First, to check if the second battery is plugged in well to the box, just press the battery level meter on the box. Also, try the two cigarette lighter plugs with some USB charger from the car, or the optional USB charger with voltage meter from the kit.
- Secondly, you want to check if the ACR works. The way it actually works is that after you turn on the engine, it waits about 30 seconds and then, if your main battery is charged enough, it connects both of the batteries and your alternator is charging them both. Once you turn off the engine, it will disconnect them some time later, to ensure you won't run down your starter battery in the middle of the desert. The easiest way to check it is with the USB charger with voltage meter - plug it in first. With fully charged second battery, it should read somewhere between 12.7-13.1. Start the engine, wait for about 30-60 seconds and (you can actually hear it) after that, it should click in and the voltage will read about 13.9 or 14.0 - that means that the alternator is charging it :)
- If you don't have the USB charger with voltage meter, open the hood and look on the ACR. When the both batteries are combined, the LED should be turn on solid. Different functions are in the manual or even the cover of the ACR, read it there if you want to know more.
Quick troubleshooting:
- Car doesn't start - you connected the starter battery wrong. Check it :)
- The ACR doesn't seem to work, no LED is flashing - you didn't connect the CABLE1+ and CABLE2+ well, or you forgot to ground it with the CABLE4+ (btw, this is what we forgot first). If both are connected, check if the Fuse Terminal Block is connected and if the fuse is inserted in it.
- The ACR flashes, but your second battery is not charging - Check the connection of the CABLE2+ on both sides, and the CABLE3- also on both sides.
- The battery box is not working: check if you connected the cables that were in the box to your second battery, together with CABLE2+ and CABLE3-
- Anything else - try to write me, or go to an electrician ;)
Thank you and let me know if this helped, or if you have any questions :)
I appreciate the feedback and hope this will save you the time and trouble of doing to homework on your own.
CLICK HERE TO DOWNLOAD THIS GUIDE FOR OFFLINE USE AS PDF